| |
|
|
You will need
- Sky DG934G Router
- Sky DG934G CD-ROM (included in box contents)
- Netgear Recovery Utility - Netgear link
- Netgear DG834G v3 firmware - Netgear link
- Patience!
If you are running Windows Vista see note at the bottom of this page. |
|
| |
|
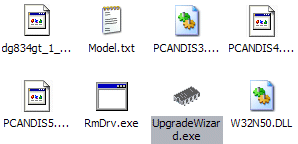
- Download and extract the Netgear recovery utility to a folder on your hard drive. You will need to use this in a moment.
|

|
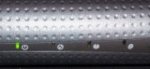
- Next you will need to put the router into its flash recovery mode. To do this, use a pen or similar object to press and hold the small reset switch on the back of the router whilst turning the router on.
The two lights on the front of the router should be flashing alternately.
|
- Insert the Sky CD into the drive, and exit the Sky installation utility. Open the CD in Windows Explorer and browse to the Utilities\Netgear folder.
- Inside there should be a Sky firmware file. The one on this particular CD is called DG934G-1SKUKS_V1.02.26.img, different revisions of the CD-ROM may contain different versions of the firmware.
- Copy the Sky firmware file into the same folder that you extracted the Netgear Recovery Utility in step 1.
- Rename the Sky firmware file to something easy to remember e.g. “firmware.img” – this will help you later on.
|

|
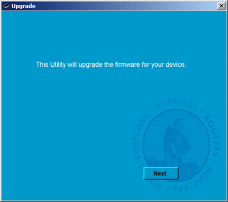
- Launch the “Upgrade Wizard” application and click the Next button on the opening screen.
- The next screen will list the network cards present in your system. If there is more than one, select the one which is connected to the Sky router. Click Next
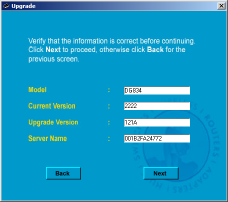
- With any luck, after a short delay, the next screen will show the 12-digit hexadecimal MAC address of the router it has discovered on the network.
|
 |
IMPORTANT: DO NOT CLICK NEXT BEFORE PERFORMING THE NEXT STEP!
The next stage involves swapping the Sky firmware file for the DG834Gv3 firmware file, so that the Recovery Utility will flash the router with the generic Netgear firmware instead of the Sky router firmware. Be sure to complete the following steps before clicking Next in the Upgrade Wizard. |
- Go back to the folder containing the Netgear upgrade wizard you created in step 1, and delete the “firmware.img” file. You don’t need this anymore.
- Find the generic Netgear DG834Gv3 firmware you downloaded earlier and extract it to the folder you created in step 1. Rename it to “firmware.img” to trick the upgrade wizard into applying this generic firmware image to the router.
- Once you have done this, switch back to the Upgrade Wizard application.
|
 |
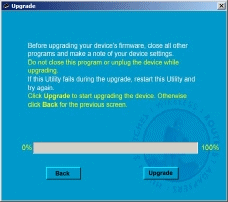
- Before clicking next ensure that all other applications are closed on your computer. This is to minimise the risk of the computer crashing during the upgrade process.
- Click Next. The utility will perform the firmware upgrade and then verify the contents of the EEPROM.
- Once the upgrade has completed, the utility will display a message indicating that the upgrade has been successfully completed. Click on Close to exit the upgrade wizard.
|
 |